Brightcove Api to Upload Video From Local Drive
Uploading Videos Using the Upload Module
The Upload module uses a dynamic ingest process to retrieve and transcode video content. When you select a file to upload, Video Cloud uses a pull-based process to pull the content from a storage location where it and then uses the Zencoder transcoding service to transcode the content.
To access the Upload module, open the Upload module.

Supported video formats
For information about video formats and codecs, and what source video formats are supported by Video Cloud, see Supported Video Codecs and Containers.
Selecting an ingest profile
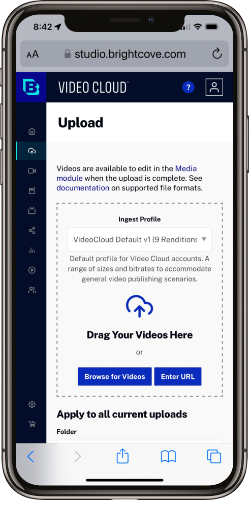
Before uploading videos, select an ingest profile. The ingest profile contains the transcode settings that volition be used when the videos are transcoded. The list of bachelor ingest profiles will vary based upon how your Video Cloud account is configured. In the following screen shot, both CONTEXT Aware ENCODING and DYNAMIC DELIVERY profiles are available.
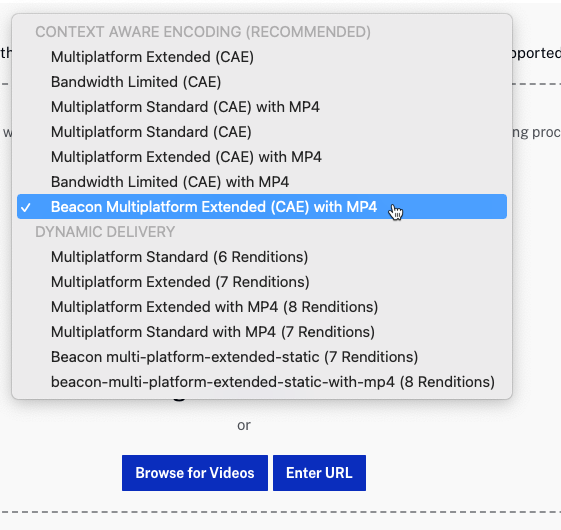
The video renditions that are created are based upon the ingest profile that is selected. For specific details on the Brightcove supplied ingest profiles, see Standard Ingest Profiles for Dynamic Delivery and Context Aware Encoding
The image dimensions for the poster and thumbnail images are based upon the prototype dimensions specified in the ingest profile.
Do I need MP4 renditions?
There are several reasons why you might desire to cull an ingest profile that creates MP4 renditions:
- Sharing using the Social module - The Social module requires that an MP4 rendition exist bachelor to share to social media. An MP4 rendition is besides required to download a video using the Social module.
- Downloading videos - If viewers will have the ability to download videos using a download link on a webpage, download from a Gallery Portal or In-Page experience or download past using an RSS feed, y'all should create MP4 renditions.
- Closed captions - (CEA 608/708) closed captions for accessibility can merely be added to MP4 renditions. You can add text rails captions to HLS/Nuance renditions but these exercise not see legal accessibility standards.
- Cloud Playout module - In order to be added to Cloud Playout channels, videos must accept at least i MP4 rendition.
- Streaming to Legacy Devices - Older devices such equally Android iv.x and prior crave MP4 renditions for streaming via progressive download.
If whatever of these employ cases are of import to you, Brightcove recommends selecting an ingest profile that generates one or more MP4 renditions.
Automatically generating captions
If the account is enabled for auto captioning and a Dynamic Commitment ingest profile is selected, an Automobile captioning option will be displayed.
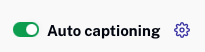
For information on auto captioning, see Automatically Generating Captions for Videos.
Calculation a forensic watermark
If the account is enabled for forensic watermarking and a Dynamic Commitment ingest profile is selected, an option to enable forensic watermarking will be displayed.

For data on forensic watermarking, see Overview: Forensic Watermarking.
Uploading videos
Videos can be uploaded using one of these methods:
Once the files have been selected, the file upload volition begin. To abolish the upload, click . Click to remove the file entry from the page. While uploads are in a processing state, do not close or move away from the browser window. Doing so may cause an incomplete upload.

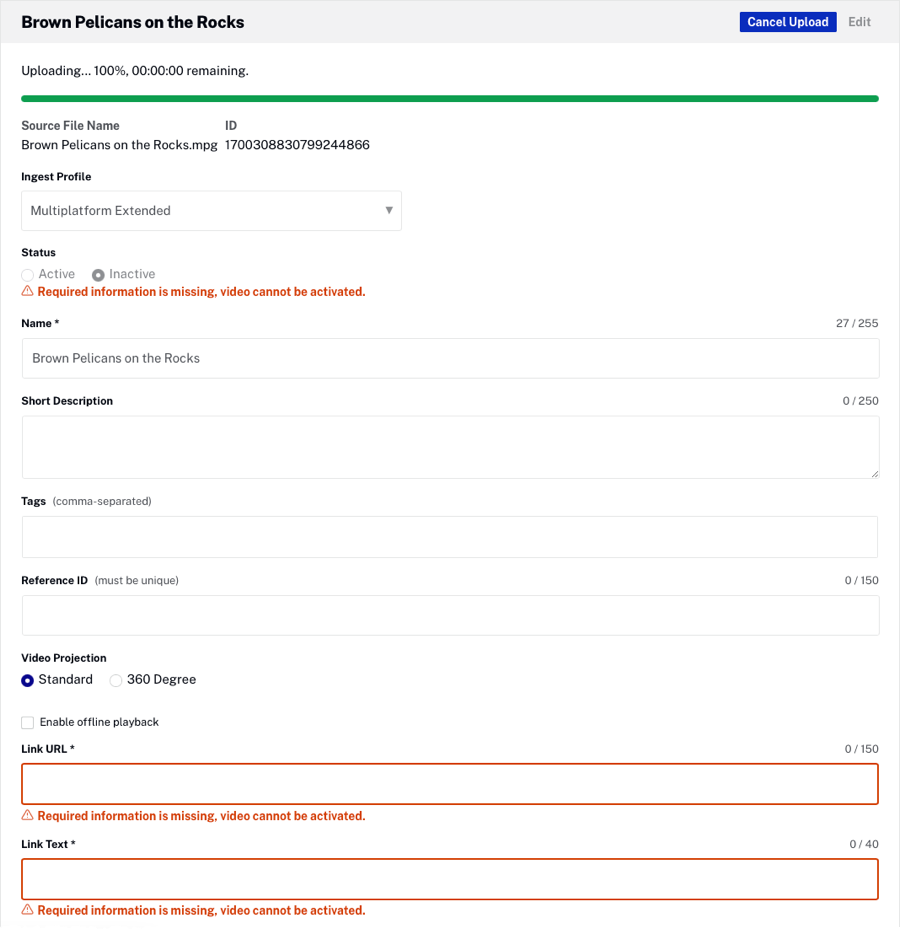
When the upload is complete, a Processing Consummate status volition display. This indicates the processing has completed and it is rubber to navigate from the Upload module.

Click to view the ingest profile and a subset of the video properties. The ingest profile tin can be inverse if the video transcoding has not started. The following video backdrop tin can exist edited:
- Status - Video status
- Active - Video tin be played
- Inactive - Video can't be played
By default, when a video is uploaded, the condition is set to Active unless required fields are missing. If required fields are missing, a message will be displayed with the required fields highlighted in red. Videos with missing required fields can yet exist uploaded but they volition remain Inactive until all of the required fields accept values. For more than data on working with required fields, see Setting Required Fields for Videos.
- Name - Title for the video
- Short Description - Curt description for the video
- Tags - Tags associated with the video
- Reference ID - Video reference ID
- Video Projection - Select 360 Degree to indicate a video is a 360 degree video. For more than information on working with 360 degree videos, see Working with 360° Videos.
- Enable offline playback - When checked, enables the video to be saved locally and viewed offline when using applications created using the device SDKs. This option will only appear if the account is enabled for offline playback. Information technology is recommended to only set up this option when using Advanced upload (when user must manually start upload processing). Setting this when a video is in the process of uploading may cause issues.
- Move to Folder - Select a folder to assign the video to. For more information on working with folders, see Organizing Videos Using Folders.
- Custom Fields - Whatsoever custom fields that have been marked equally required volition appear.
To larn more nearly video properties, come across Editing Video Properties using the Media Module.
Click to save any changes and brainstorm the transcoding process.
Upload additional assets
When the Upload Additional Assets business relationship setting is enabled, the video properties panel volition also display buttons allowing poster and thumbnail images to be uploaded along with the video. Click to cull poster and thumbnail images and and so click Process to brainstorm the transcode.
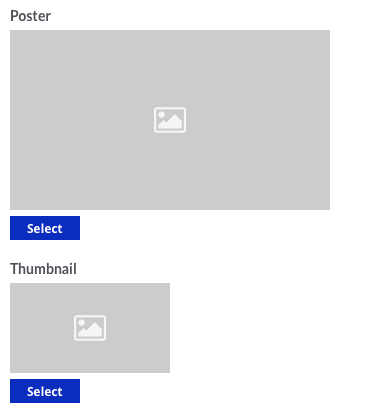
Note that the image dimensions for the poster and thumbnail images will be based upon the image dimensions specified in the ingest profile. For data on configuring the Advanced Upload account setting, see Managing Account Settings.
Setting a default folder and tags
When uploading videos, a folder and tags for the videos being uploaded tin be specified. The folder dropdown list volition display a listing of all the folders that have been created in the Media module. Click + Create binder to create a new folder and assign the video(s) to the new folder. When creating a new folder:
- Name is express to 100 characters
- Folder names must be unique inside an account
- Illegal character: /

When a folder is selected, all uploaded videos will be added to that folder. For data on creating and assigning videos to folders using the Media module, come across Organizing Videos Using Folders.
Tags tin can also be assigned to videos as they are uploaded. Enter a comma-separated listing of tags to assign to videos.

After selecting a folder or adding tags, click to save the changes. Note that the folder and tags will be applied to all videos that are uploaded, in the process of being uploaded or where the upload has finished and the video is however displayed in the Upload module ( button hasn't been clicked).
Uploading videos from mobile devices
The Media module is written entirely in HTML5 and tin besides be used on tablet and mobile devices. This allows you to shoot video with a mobile device and upload it to your Video Cloud business relationship. To upload content from a mobile device, open up the Upload module and select an ingest profile. When you click , the photos awarding on the device will open. Select the videos to upload and click done. The videos from the mobile device will brainstorm uploading and the progress will exist displayed on your device.
Special characters
If you lot are providing a URL for Video Cloud to fetch your videos, and you are sending credentials as office of the URL, you need to percent-encode certain reserved special characters:
| Character | Per centum-Encoded |
|---|---|
| ] | %5B |
| [ | %5D |
| ? | %3F |
| / | %2F |
| < | %3C |
| ~ | %7E |
| # | %23 |
| ` | %6D |
| ! | %21 |
| @ | %40 |
| $ | %24 |
| % | %25 |
| ^ | %5E |
| & | %26 |
| * | %2A |
| ( | %28 |
| ) | %29 |
| + | %2B |
| = | %3D |
| } | %7D |
| | | %7C |
| : | %3A |
| " | %22 |
| ; | %3B |
| ' | %27 |
| , | %2C |
| > | %3E |
| { | %7B |
| space | %20 |
For example:
/* unencoded */ ftp://user@example.com:laissez passer!discussion@example.com/path/to/input.mp3 /* encoded */ ftp://user%40example.com:pass%21word@case.com/path/to/input.mp3 Mutual upload errors
The upload process seems to hang or makes no progress
Attempt clearing the browser cache and then upload the video again. We have seen that clearing the browser enshroud will assistance resolve video upload issues.
The deviation between the asking time and the current time is too large.
This error volition occur when the system time on the car uploading videos is not set correctly. This usually happens afterwards a fourth dimension change. Make sure your car is set to the correct time.
Source: https://studio.support.brightcove.com/media/uploading-videos-using-upload-module.html
0 Response to "Brightcove Api to Upload Video From Local Drive"
Post a Comment